November – What to do in the Garden – Dahlias & Amaryllis – provided by Nancy Greeley
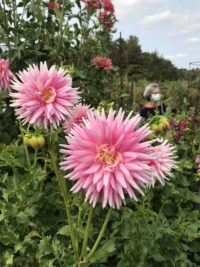
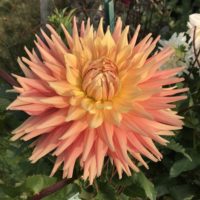
We’re about to get a break from outdoor gardening, but there are a few things we still need to get done outside and inside. I planted dahlias for the second time this year and wow were they beautiful! I learned that they really do grow tall and wide and you need to plant them in full sun with room to grow. I also learned that you really do need to stake them and protect them from hungry critters. Surprisingly, some varieties were more prone to nibbling critters than others. After several of my plants were reduced to celery stalks, I enclosed the vulnerable ones with chicken wire and hoped for the best. I was amazed that they recovered and delivered gorgeous blooms! Next year I’m sure I’ll have even more success. This year I was also careful to label each plant so I can dig up the tuber and grow more next year. I’m embarrassed to admit that last year I neither labelled nor dug up my dahlias. Lesson learned!
I dream of living in a climate where we don’t need to dig up dahlia tubers or bring tender plants inside to over winter. But since we all call Connecticut home; we need to act now to save some of our favorites to enjoy again next year.
Dig Up Those Gorgeous Dahlias: Dahlias can potentially stay in the ground in U.S. Department of Agriculture plant hardiness zones 7 through 10. Here in Connecticut we need to take action. In the fall dahlias stop growing and flowering, but the dahlia tubers — which look somewhat like bulbs — remain healthy under the soil. Digging up the tubers and storing them helps prevent damage from frosts over winter. When spring comes, you can divide the tubers to increase the number of plants.
The best time to dig up dahlia tubers is after the first frost in fall. Before you start to dig, however, be sure to:
– Pull up, clean and store the stakes that you used to support your dahlias
– Clearly label each plant so you know what variety you’re digging up
– Sterilize your pruning shears by carefully wiping the blades with a cloth soaked with rubbing alcohol
– Prune the remaining stems on each plant to 3-4 inches. Sterilize the pruning shears again when you finish.
– Tie name tags around the stems so you can identify each variety next spring. Orange caution tape or something similar works well.
Carefully Dig Up Your Tubers: Carefully dig with a garden fork or shovel approximately 6 to 9 inches from the base of a dahlia plant to gently loosen the soil around each tuber. Dahlia tubers look a lot like a group of fingers. You want to be gentle so you don’t break off any of these fingers.
Gently break the loose soil from the tuber with your fingers and place the tuber upside down in a dry place for one day, or until the soil around it is dry. One source I read recommended that you not dry the tubers on cement, since cement tends to absorb moisture and may dry out the tubers. Interesting!
Brush off the remaining soil with your fingers.
Be sure to discard dahlia tubers that are soft or discolored or smell bad. Diseased and decaying tubers don’t last in storage and may spread rot to other tubers.
Store Your Tubers in a Cool, Dark Spot: Once you have the tubers dug up and labeled, you’ll need to store them in a cool, dark, dry spot over winter. They’ll be ready for dividing in spring after the final frost. Store the tubers in moist peat or saw dust to help prevent them from shriveling. The storage temperature must be above 32 degrees Fahrenheit.
For more information on the growing, handling and care of dahlias, please click on the following links: How to Overwinter and Divide Dahlia Tubers video and Growing Dahlias webinar to watch instructional videos by our own dahlia expert, Suzanne Knutson.
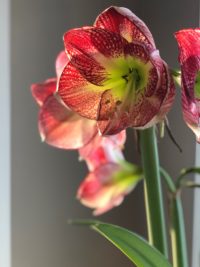
Amaryllis: Time to Bring Them OUT of the Cool Dark Place:
My amaryllis have been resting in my front hall coat closet since mid-September. All of the leaves have turned brown and the bulbs have absorbed all the energy from the leaves and are eager to bloom again, if only given the chance! In the next week or two I will bring them out.
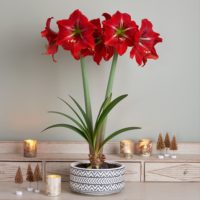
These stunning plants are surprisingly resilient and easy to care for. As an example, a few years ago, I put my pots of amaryllis in my basement in September to hibernate. It’s fairly dark and cool, but not ideal. I didn’t dig them up, I just brought the pots in. I did pull one out of the ground and threw it on top of the potted ones. In November, I pulled them out, cut off the dead leaves, watered them and waited for the beauty to erupt! Before long, the bloom buds were emerging and over the next few months, I had gorgeous blooms. The Rapido is always the first to bloom, other varieties can take up to 6-12 weeks to kick into gear. Despite their stunning beauty, amaryllis are easy to care for so don’t be shy, give them a try!
I said earlier that they are surprisingly resilient. Well, my story continues; in June of the following year, I noticed a pot of 3 amaryllis that were hidden away in my basement and were forgotten when I brought the others out for the holidays. To my surprise, one of the amaryllis bulbs had a sad little bloom that was about to open. This poor bulb hadn’t been watered since early September, close to 9 months! The soil was dry to the bone. I immediately brought the pot outside and gave it a good drink and left it in a sunny place. I was rewarded by vigorous and multiple blooms from all 3 amaryllis bulbs! I’m not sure I’ve had another plant that’s this forgiving, or so beautiful.
Why, do you ask, have I shared this story? Because I want you to love amaryllis as much as I do and I don’t want you to worry about doing everything just right. Follow these steps and you will have success:
 – Pot them up 6-12 weeks before you expect them to bloom
– Pot them in a container that is just slightly larger than the bulb. They like to be cozy in their pot. If you plant multiples in one pot, pot them close together.
– Allow for at least a couple inches of soil below the bulb to allow space for the roots to grow. If you don’t leave space the roots will grow and push the bulb up and out of the soil. The same thing can happen with paperwhites.
– Cover the bottom half to two thirds with soil (in other words, leave the top half exposed).
– Consider planting them in a tall hurricane type vase. This keeps them upright and it looks quite beautiful.
– Get creative with different types of pots and add embellishments. This way they look beautiful even before the blooms show themselves.
– Once potted, give them a good watering.
 – Wait until the bloom bud begins to emerge before watering again. This may take weeks, just be patient.
– Do not over water.
– Enjoy the blooms!
– Once the blooms are spent cut the bloom stem off at the base, BUT do not cut back any leaves.
– Keep watering occasionally until its warm enough to take the pot outside.
– Leave it outside in a sunny spot all summer, watering occasionally.
– Bring inside in September to a cool, dark place, stop watering.
– Repeat!
Enjoy these next several months enjoying your indoor plants and pondering the possibilities in your garden for the year ahead. The winter months are perfect for reviewing photos you’ve taken of your gardens, studying “inspiration” gardens, researching plants and shrubs and sketching new plans for your gardens. One of the many benefits of being a gardener is that there’s always something to learn and aspire to. A garden can continually evolve and support your creative juices. While my garden doesn’t always live up to my dreams, it nurtures my creativity, keeps my body active and soothes my soul. Enjoy!
Nancy Greeley (nagreeley@gmail.com, 952-9359) Wilton Garden Club